
How to play videos (and more) in your Microsoft Teams meetings
Imagine a scenario where you want to present a professional looking presentation over a Teams meeting. For example, you might want to present:
- Company financial results to the board
- Deliver a training course
- Demonstrate complicated functionality (where you just know it will go wrong).
To make your presentation as slick as possible, it’s a great idea to prerecord certain sections so that you can play them to the attendees at the right time. This way you can be sure of it all working smoothly.
Let’s consider an example. Here’s how an ‘end of Sprint’ presentation could look:
- Start meeting and welcome attendees. (Show your web cam)
- Give an overview of what you are going to cover. (Share your screen and show a PowerPoint slide).
- Explain that you are going to demonstrate all of the new features that your team just built. (Show Planner board).
- Then, for each feature, you could play a prerecorded video of the new functionality. When your team has worked hard to deliver on time the last thing you want is a “server going down” and being unable to show off your awesomeness!
- After all of the features are demo’d, you then show a ‘burndown chart’ in Excel, ‘completed tasks’ in the Planner, or maybe even the completed Sprint in MS Project. (show the different apps)
- Time for questions. (show your webcam again).
If you think about all of that, there’s a lot that could go wrong:
- You need to find and open different applications such as PowerPoint, Excel, Word, Web Pages and other Applications.
- You need to make sure your attendees can see the them as quickly as possible without having to re-share different windows, so you decide to share your entire desktop.
- If you don’t have multiple monitors you need to make sure Facebook doesn’t pop up a notification or that Outlook doesn’t “ping away”.
- If you are hunting around for files before opening them, this can be frustrating for attendees and cause more stress to you because you are trying to find things.
- When you want to play the videos you will hit problems with sound because you will have to do this via a screen-share. The attendees either won’t hear the video or you may encounter feedback, lagged/poor sound because you are relying on your microphone to pick up the audio from your speakers. (If you have a headset they won’t hear it at all).
There’s a much slicker way, so let me introduce a piece of software called Xsplit. Xsplit is popular in the gaming community. They use it to stream themselves playing video games to Twitch. However, don’t let that put you off.
We used Xsplit to carry out a massive virtual conference at Microsoft HQ in Redmond. You can see it in use here:
The background in the video was actually a 15 second, looped clip that I recorded the day before outside Building 52. Andy and Mark were actually sitting in a room with a green screen behind them.
The banner (with the scrolling message) along the bottom was added in as a graphic on top of the feed using Xsplit.
In short, with Xsplit, we composed the scene, took in multiple audio feeds and transmitted one feed out to YouTube live. If you wanted to, you could do exactly the same by selecting the Xsplit virtual camera in your Teams meeting.
Here are some of the cool things you can do with Xsplit:
- Have a custom background using vCam (another Xsplit program). You don’t need a green screen for this. (This is coming natively to Teams soon).
- Bring in remote cameras/streams. Maybe you have a colleague or partner company who is not in Teams but is on Skype?
- Use a professional looking green screen allowing you to create studio effects (see video above).
- Bring multiple cameras into one feed. You might have several cameras feeding into your PC/laptop which you would like to compose into a feed and send out. (News and chat shows do this all the time on the TV).
- You can stream your presentation to YouTube, Facebook, Twitch, Restream.io (brings in LinkedIn Live), Local Stream (and many others) at the same time.
- Add text and effects to run at the time you set. e.g. pop your name in the bottom 3rd of the screen like news programs do.
- There are also extra sources, extensions and outputs you can integrate easily.
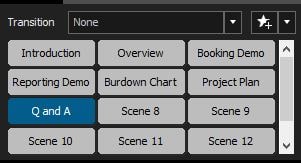
- Create pre-made scenes that are simple to switch between. In our example above, you’d create an individual scene for:
- Your camera full screen with a bottom 3rd (your name) sliding onto the screen.
- A video playing the demo of the new features.
- The PowerPoint
- The web page showing the project plan.
- etc.
If you’d like to see how this is done, the video above shows it in action!
Xsplit isn’t free, but also isn’t expensive ($200 for lifetime). If you are constrained on budget you can look at OBS Studio which is free. Wirecast is also worthy of a note as it does the same.
Lastly, it’s also worth noting that Microsoft Teams Live Events are starting to add more of these features, but if you want something simple that you can use in a normal Teams meeting, this could be a good way to go! Here’s the licensing info on streaming live events in Teams.
