
What you expect?
- How to install SharePoint 2010/2013 single-multiple servers using AutoSPInstaller?
- Which Service Accounts are used and why they are needed for SharePoint Server and SQL Server Installation & configuration?
- What should we take care while Configuration of AutoSPInstallerGUI?
Recently I have installed the SharePoint Server 2013 on multiple servers. First I will define my Environment. So it’s helpful for understanding the Server’s Architecture.
I have two application servers, two web front end servers and one database server
Server Architecture:
| Server Name | Description |
| SPAPP1 | Application Server 1 |
| SPAPP2 | Application Search Server |
| SPWEB1 | SharePoint Web Front End 1 |
| SPWEB2 | SharePoint Web Front End 2 |
| SQLDB | SQL Server |
Three-tier farm configuration
- You can add web servers (SPWEB1, SPWEB2) to the web tier. These servers can be configured as conventional web servers to handle user requests, or they can be configured to host dedicated query components or other service components.
- You can add application servers (SPAPP1, SPAPP2) to the application tier and configure them as dedicated servers that will host the SharePoint Central Administration website or other services on the farm that require dedicated resources or isolation from the web tier — for example, crawl components, query components, and profile pages.
- You can add database servers to the database tier (SQL) to implement a stand-alone instance, database mirroring, or a failover cluster. To configure the farm for high availability, database mirroring or a failover cluster is required on the database tier.
SharePoint Service Accounts
Why we need Service Accounts while installing and configuring the SQL Server and SharePoint Server?
If the Service Accounts cannot configure properly while SharePoint Installation and configuration then they can open big security problems. So need to set up the accounts as per the security risk.
By giving fewer rights to each account, you limit the possible damage in case an account gets hacked and also follow Microsoft’s recommendation of installing SharePoint 2013 with least-privilege administration
I have used below two service accounts SQL_Admin and SQL_Service for SQL Server and 10 SharePoint Service Accounts for SharePoint Setup, Farm Administrator, Web Application Pool, Service Application Pool, My Site Application Pool, Crawl and Search Service accounts, User Profile account, Cache Object accounts
For the SQL Server
|
Name |
Description |
Local Rights |
Domain Rights |
| SQL_Admin | SQL Admin on the SQL Server. Used to Install the SQL Server. | Local Administrator on the SQL Server | Domain User |
| SQL_Services | It is the service account for the following SQL Server services: MSSQLSERVER SQLSERVERAGENT. | None | Domain User |
First I have installed SQL Server 2012 R2 on SQLDB server.
After completing the SQL Server installation, you need to set up SQL Server Alias for SQL Server for Remote access. So we can directly connect to SQL Server using the given alias name instead of the SQL Server Instance name.
I have already written blog on how to configure SQL Server Alias and you can get over it from: http://codecreature.wordpress.com/2014/08/11/create-and-configure-sql-server-instance-and-alias-for-sharepoint-installation/
Here I have created SQL Server Alias named “DevDB”.
Now it’s time for creating the SharePoint Service Accounts
SharePoint 2013 Service Accounts Practice
|
Name |
Description |
Local Rights |
Domain Rights |
|||
| SP_Install | The server farm account is used to perform the following tasks:
|
Local Administrator on all the SharePoint Servers. SecurityAdmin and DB_Creator rights on the SQL Instance | Domain User | |||
| SP_Farm | The server farm account is used to perform the following tasks:
|
SecurityAdmin and DB_Creator rights on the SQL Instance | Domain User | |||
| SP_Portal | The SP_Portal account is used to run the Web Application Pools. | None | Domain User | |||
| SP_MySite | The SP_MySite account is used to run the MySite application Pool | None | Domain User | |||
| SP_Services | The Services Account is used to run the Service Application Pool | None | Domain User | |||
| SP_Crawl | The Default Content Access Account for the Search Service Application | None | Domain User | |||
| SP_Search | Service Account to run the SharePoint Search “Windows Service” | None | Domain User | |||
| SP_UserProfiles | The User Profile Synchronization Account | None | Replicate Directory Changes permission on the domain. | |||
| SP_CacheAdmin | Web application Policy Full Control. So items can be cached by ASP.Net to improve the performance | None | Domain User | |||
| SP_ CacheReader | Web application Policy Read Control. So items can be cached by ASP.Net to improve the performance | None | Domain User |
Replicating Directory Changes permission to the Profile Service account
For configuring the replicating directory changes permission to profile service account: http://technet.microsoft.com/en-us/library/hh296982.aspx
AutoSPInstaller and AutoSPInstallerGUI
AutoSPInstaller is an open source set of PowerShell scripts that installs and performs a base configuration of SharePoint Server 2010 or 2013. These scripts were originally authored by Brian Lalancette and Andrew Woodward as well as other community contributors. It configures a single or multi-server SharePoint farm based on a predefined configuration XML file.
Download link for AutoSPInstaller: http://autospinstaller.codeplex.com/releases/view/38568
For Multi-Server deployment, Provides the Sharing access on extracted folders of AutoSPInstaller. So all other SharePoint Servers can access it while installation.
Files Structure inside AutoSPInstaller Extracted Folder
 AutoSPInstaller can be run either in
- Offline Mode: In Offline mode you need Prerequisites files
- Online Mode: In Online mode, it will automatically download Prerequisites files from internet.
SharePoint 2010 Media
- Download SharePoint 2010 Prerequisites – Here is the download link for SharePoint 2010 Prerequisites
- After Completing the download of prerequisites, put prerequisites files inside PrerequisitesInstallerFiles Folder
- (SP->2010->SharePoint->PrerequisitesInstallerFiles)
- (SP->2010->SharePoint)
- Then Open your SharePoint 2010 installation media and copy it to SharePoint Folder.
SharePoint 2013 Media
- Download SharePoint 2013 Prerequisites
- After Completing the download of prerequisites, put prerequisites files inside PrerequisitesInstallerFiles (SP->2013->SharePoint->PrerequisitesInstallerFiles)
- Then Open your SharePoint 2013 installation media and copy it to SharePoint Folder. (SP->2013->SharePoint)
Why we to use AutoSPInstaller?
PowerShell is recommending for the below reasons:
- Streamlined Deployment
- Reduce Human Error
- Generate Farm Configuration Documentation and
- Repeatable procedures for deploying staging and development environments to mirror production.
Why we to use AutoSPInstallerGUI?
AutoSPInstaller’s configuration required very high knowledge of the PowerShell, SharePoint Architecture, Active Directory and most important accuracy. Because it only contains the PowerShell Script. But if you know basic level of SharePoint Structure, then by using the AutoSPInstallerGUI, it is possible to configure the single server/multiple servers SharePoint Installation.
AutoSPInstallerGUI is a Windows application that helps you build this configuration XML file with useful tooltips, tabular GUI, and error checking on your inputs. AutoSPInstallerGUI is built and maintained by Ivan Josipovic. Both of these projects are hosted on Codeplex and are free to use.
Download link for AutoSPInstallerGUI: http://autospinstallergui.codeplex.com/
Extract both file and put it in right place.
Note: If you get the following issue with AutoSPInstallerGUI opening:
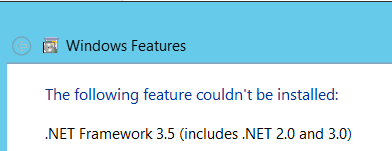
Then you just have to enable .NET Framework 3.5 in just current server where AutoSPInstaller is running.
You can enable the .NET Framework 3.5 yourself through Control Panel. In Control Panel, choose Programs and Features, choose Turn Windows features on or off, and then select the .NET Framework 3.5 (includes .NET 2.0 and 3.0) check box. You can also select option child option as per your requirements

Restart the Server.
For Executing the Script Unattended we have to take care of below steps for all the SharePoint Servers listed as above:
Prepare for Unattended SharePoint Install
- Open Run (Press Windows + R) by type “msconfig”
- Select Tools” tab and Launch “Change UAC Settings”.
- Scroll to the “Never Notify” and press OK”
Turn off warning on file open
- Open Run (Press Windows + R) by type “gpedit.msc”
- Redirect To : User Configuration => Administrative Templates=> Windows Components=> Attachment Manager=> Inclusion list for low file types=> add ”exe;” to the list.
- Restart the SharePoint Server
AutoSPInstallerGUI Configuration
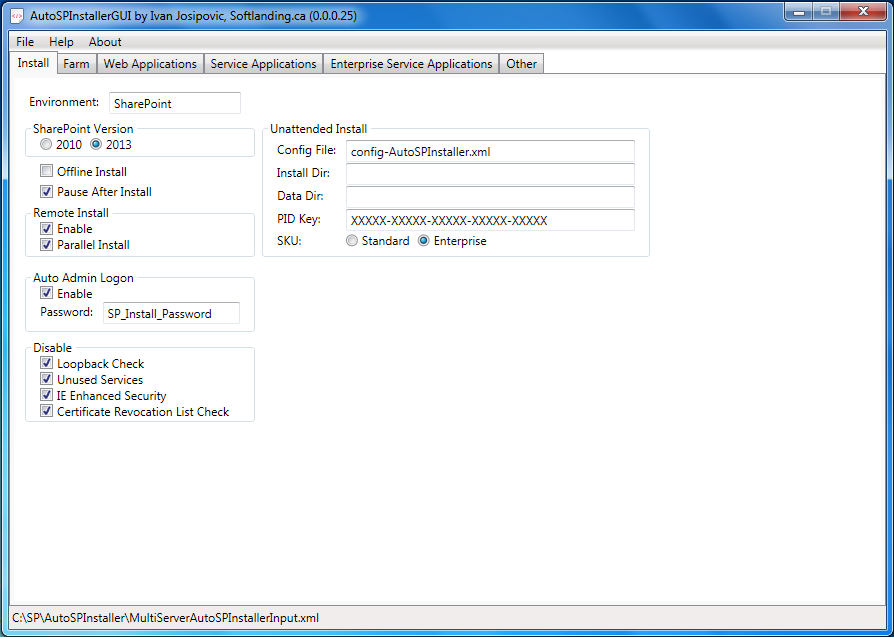
Step 1:
| SharePoint Version | SharePoint version which you will going to install |
| Offline Install | If enabled, SharePoint prerequisite will be installed from SharePoint\SharePointPrerequisite Folder
If disable, SharePoint prerequisite will be downloaded during install. Don’t need to put prerequisite in SharePoint\SharePointPrerequisite Folder. Just enable the internet. |
| Pause After Install | It’s useful for multiple remote server installation. The script will pause after SharePoint binaries are installed. |
| Remote Install | For multiple remote server installation. There are two options:
Enable: Script will know, its remote install and configure the farm for multiple remote servers Parallel Install: Override the “Pause After Install” option and install SharePoint binaries on multiple remote servers simultaneously to speed up the things. |
| Auto Admin Logon | For automatic logon using SharePoint install account at server restart while SharePoint binaries Installation. |
| Disable | Check all the options for smooth execution. Which disable network loopback check, disable unused services while installation. |
| Unattended Install | Config File: Create automatically if not specified, contains configuration used while installation.
Install Dir: define the place of SharePoint Server program files, It doesn’t have connection with 14/15 hive. By default, Install Dir is /%ProgramFiles% Microsoft Office Servers/ Data Dir: define the place for SharePoint 14/15 hive. PID Key: SharePoint Server Product ID Key. |
Step 2:

| Passphrase | To join additional server to the farm and used in secure token service application |
| Farm Account | Add To Local Admins During Setup: Add farm account to local admin group of servers and required for UPS Application.
Leave In Local Admins: leave farm account from admin group if enabled Username Password: Farm account credentials |
| Database | DB Server: Database Server where SharePoint Config Database will resides. Its better to pre configure the Alias for the DB server instance and you just need to specify the alias name. To create SQL Server Alias follow: Create SQL Server Alias
Create Alias: don’t need to create alias if you have configured alias already as in DB server. DB Prefix: “DB Prefix” is perpended to all database name which are created during SharePoint Installation. I have used “SP”. So SharePoint “config “database named as “SP_Config” Config DB: Farm configuration database. Database is Named as “SP_Config” in DB Server |
| Central Administrator | Provision: Which on which host the Central Administrator Web Application. Preferred, Application server (“SPAAP1”) is used to host the central admin or you can say that where the CA is configured that server is called as application server in SharePoint multi servers.
DB Name: Central Admin web application database.”Content_Admin” becomes “SP_Content_Admin” in database server “DevDB” Port: Port number on which CA will run. Use SSL: Automatically create SSL certification if SSL enable. |
| Managed Accounts | Managed Accounts: A Managed Account is effectively an Active Directory user account whose credentials are managed by and contained within SharePoint.
I have configured below Managed accounts from the above SharePoint Service Account Domain\SP_Service: For most of the SharePoint Service except Search Service Domain\SP_Portal: Application pool account for web application 1 Domain\SP_MySite: Application pool account for my site web application Domain\SP_Search: used by search service |
| Object Cache Accounts | Super User: Web application Policy Full Control. So items can be cached by ASP.Net to improve the performance (SP_CacheAdmin)
Super Reader: Web application Policy Read Control. So items can be cached by ASP.Net to improve the performance (SP_ CacheReader) |
Step 3:
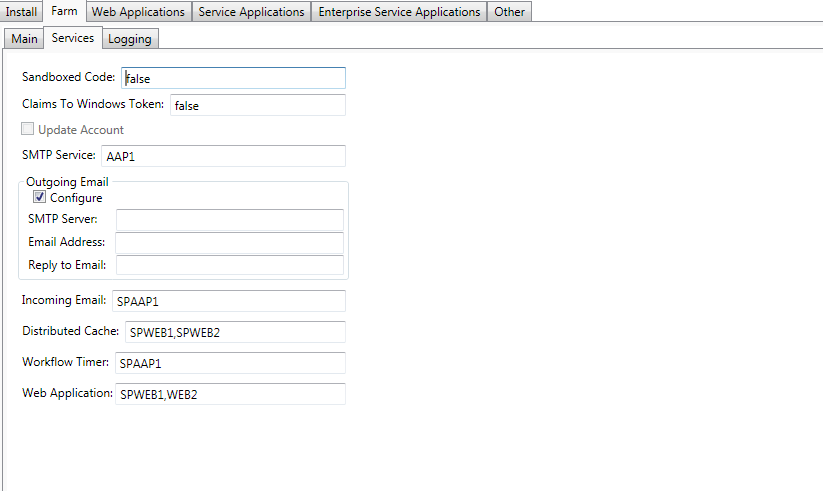
| Sandboxed Code | On which server, Sandbox service will run, false means do not need to host.
Same for the Claim To Windows Token and SMTP Service. If you want to configure then provide the server name I am hosting the SMTP Service on application server(SPAPP1) |
| Outgoing Email | Enable to configure the outgoing SMTP setting for Farm |
| Incoming mail | Provide same server on which SMTP service is running(SPAPP1) |
| Distributed Cache | Provides distributed cache on server. Web Front End Servers are preferred.
So I have given my two WFEs as (SPWEB1,SPWEB2) |
| Workflow Timer | Host Workflow Time Service. Provide the app server name(SPAPP1) |
| Web Application | Host SharePoint Web application on web front end. For multiple WFEs, provide comma separated name as SPWEB1,SPWEB2 |
Step 4:

| IIS Logs | You can provide the separate log location instead of the 14/15 hive folder. I have given the separate folders for logs in D: drive.
In addition, also specify the log disk usage in GB and how many days to keep logs interval in days |
| ULS Logs | |
| Usage Logs |
Step 5:


| Add URL to HOSTS | If you have not configured the DNS for Web Application URL, then enabled flag will all add Alternative Access Mapping URL to the Local server’s host file |
| WebApplications | By default its provide two, web applications. Portal and MySite. We also have the add/remove options to add more or remove Web Application. But there is one limitation is that we must have to create/configure one Web Application either Portal or MySite.
I have added two Web Applications: Portal and MySite |
| Type | Web Application Type, you can use Portal or MySiteHost as per the Application.
One Web Application should have this type at a time. |
| Name | Web Application Name |
| App Pool Name | Application Pool Name under which the Web Application will run. |
| URL | Web Application Host Header. All Site Collection will begin with this name and please choose http:// or htttps:// carefully. Do not add port number. It’s below. |
| Port | Port Number of Web Application |
| Database Server | Provide the SQL Server or Alias Name as configured above. By default it will take farm database server. |
| Database Name | Content Database Name for the Web Application. |
| Database Alias | If you have already configured the SQL Server Alias then it’s not need to configure |
| Use Host Header | If Checked, then web app URL will be placed in IIS Bindings. If you configure the same host named site collection (http://SharePoint), then do not need to enable. |
| Add URL To Local Intranet Zone | If checked, then while browsing the web app, it will not ask credentials. |
| Grant Current User Full Control: Provides current user all control on web app. | |
| Use Claims Authentication: Enable Claims Authentication | |
| Use Basic Authentication: Enable Basic Authentication | |
| Managed Paths | Allows to create addition managed path and url |
| Site Collection | We can add/remove multiple site collections per web application using this GUI. |
| Site URL: Site collection URL. Don’t include the port number | |
| Host Named Site Collection: Enable to create Host named site collection. | |
| Owner: Site Collection Owner Account. It’s required. Otherwise script will fail. | |
| Name, Description: Provide the name means Title and Description | |
| DBName: Content DB of site collection, IF not specified then, it will use Web App Content DB by default
Search URL: Search center URL. |
|
| Custom Template: we can choose custom web template for the root web for site collection. Currently I have selected Team Site Template. |
Step 6: Configured the Search Service Application on Separate Application Server (SPAPP2) and All Other Services are on other Application Server (SPAPP1).


| Search Service Instance | Provision: Server Name, On which the Search Service Instance is created. I have used separate application server which host the Service Application (SPAPP2) |
| Connection Timeout: In Seconds, wait to crawl contents, links. So please assign value carefully. Not too high, not too low. 60 seconds are recommended.
Acknowledgement Timeout: how long wait for request ack. |
|
| Contact Email: For contact content admin if crawl error or performance error occurs. | |
| Search Service Application | Name –Proxy of Search Service Application |
| Content Account and Content Acc Password: This account is used for Content Crawling. | |
| Search Center URL: Default search center URL for all site collections. | |
| Database Name, Database Sever: Search Service Database Name and DB Host Server Name (Alias Name). | |
| Application Pool Name and Admin Component App Pool Name: Application pool name under which search service will run. | |
| Search Topology: Provide the server names for proper distribution of search service. I have configured the separate Application Server for Search Service |
Step 7: All Other Services except Search Service are hosted on Application Server (SPAPP1)
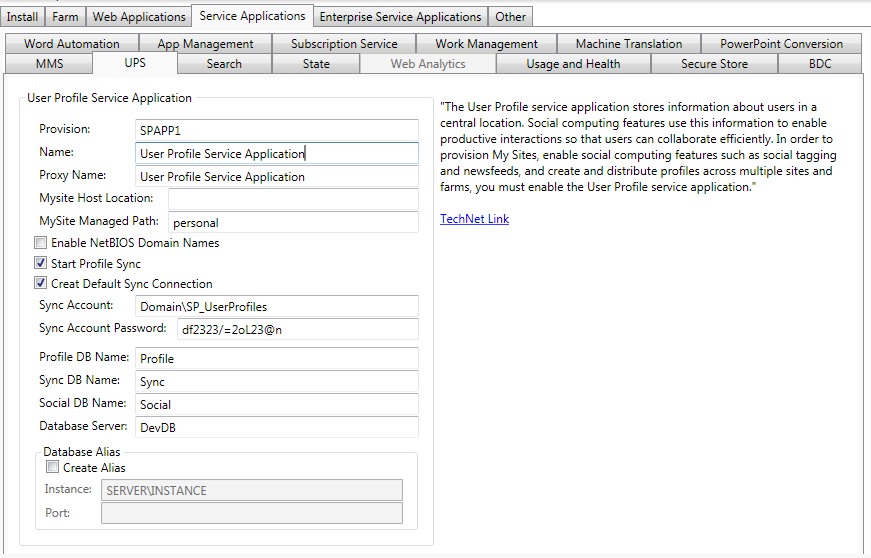
| UPS | User Profile Service also need the Provision server name, Service Name, Proxy Name, Content DB names for Profile, Sync and Sync and Database Server name as configured in Search Service. |
| Sync Account: This account name is same name which we have used in replication Active Directory Change configuration for providing the synchronization between AD and SharePoint User profile accounts.
I have used Domain\SP_UserProfiles Also check the Start Profile Sync and Create Default Sync Connection for starting the service and creating the sync connection between AD and SharePoint Servers. |
Step 8:

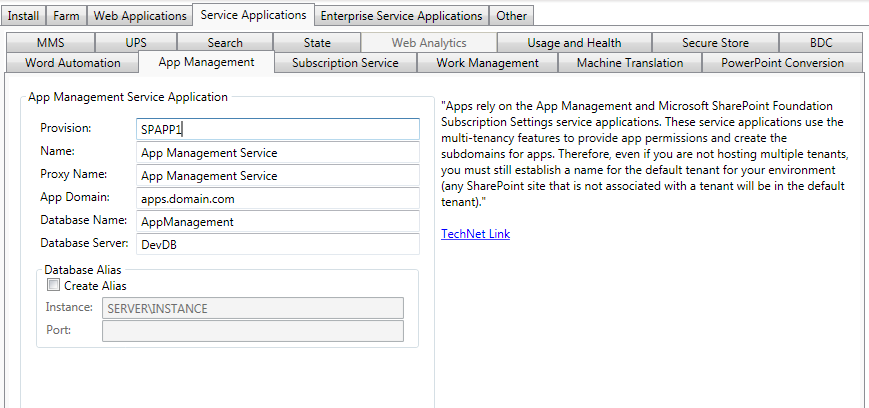

| BDC, MMS and App Management Services | Service need the Provision server name, Service Name, Proxy Name, Content DB names for Profile, Sync and Sync and Database Server name as configured in Search Service and UPS.
Now all other services have the same configuration as above. |
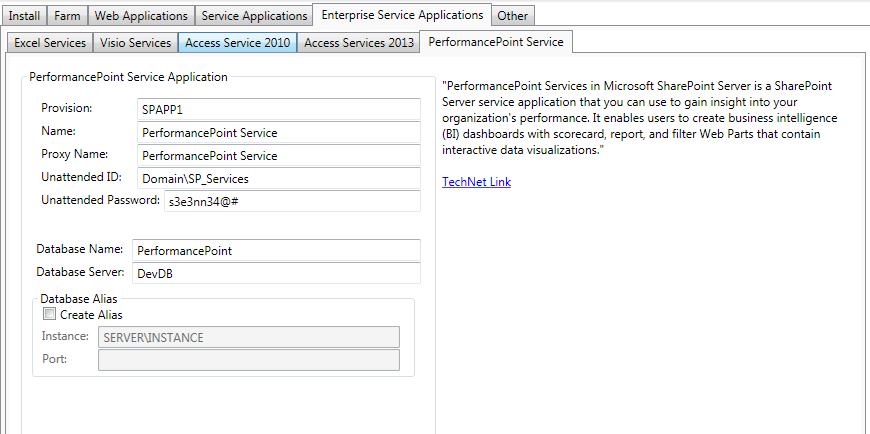
Step 9:
You can configure the five Enterprise Service Applications of Excel, Visio, Access 2010, Access 2013 and PerformancePoint Service by provide the Host Server and Database name, Service Account Name like below displayed the Performance Point Service Configuration:
 Execute the Configured AutoSPInstaller XML using PowerShell
After completing the AutoSPInstaller configuration, You can save as XML file as “DevAutoSPInstaller.xml” in the AutoSPInstaller folder as shown in figure.
I have taken the different name, because I can use the actual “AutoSPInstallerInput.xml” file for reference.
Before running the AutoSPInstaller PowerShell, Please make sure that you logged with with “SP_Install”(which is local admin on all SharePoint Server and also has SQL Server Permission with DBCreate and and SecurityAdmin ) account in your server.
Currently I am logged in with “SP_Install” account on “SPAPP1″ application server.
Now, Drag the new XML file “DevAutoSPInstaller.xml” into the AutoSPInstallerLaunch.bat.
If you directly run “AutoSPInstallerLaunch” bat file, by default it will use “AutoSPInstallerInput.xml”. So take care while running the bat file.
Stay Connected…
Thank you…
